Key Takeaways
- A whole-house water filter (the EPA calls it a point-of-entry, or POE, system) treats every tap in your home, not just the kitchen sink. That matters most for well water, which often carries sediment, iron, or hardness minerals that treated municipal supplies don’t.
- Test your well water before buying a filter. The CDC recommends matching the filter’s micron rating and NSF certification to whatever your test results actually show, rather than guessing.
- Installation involves six main steps: choose a location, shut off and drain the system, cut the supply pipe, attach fittings and a bypass valve, mount the housing, then turn the water back on and check for leaks.
- A confident DIYer can usually finish in half a day; hiring a licensed plumber typically takes about three hours and costs $150–$400 in labor on top of the filter itself.
- Sediment pre-filters usually need replacing every 1–3 months on well water, more often than on municipal supplies, because well water tends to carry more particulate.
If your home’s water comes from a private well, a whole-house water filter is one of the most effective upgrades you can make. Unlike a pitcher or under-sink filter that only treats water at one tap, a whole-house system intercepts water where it enters your home, so every faucet, shower, and appliance gets filtered water. This guide walks through how to install a whole-house water filter on a well step by step, what to check before you buy, and how to keep the system running well afterward.
What Is a Whole-House Water Filter, and Why Install One on a Well?
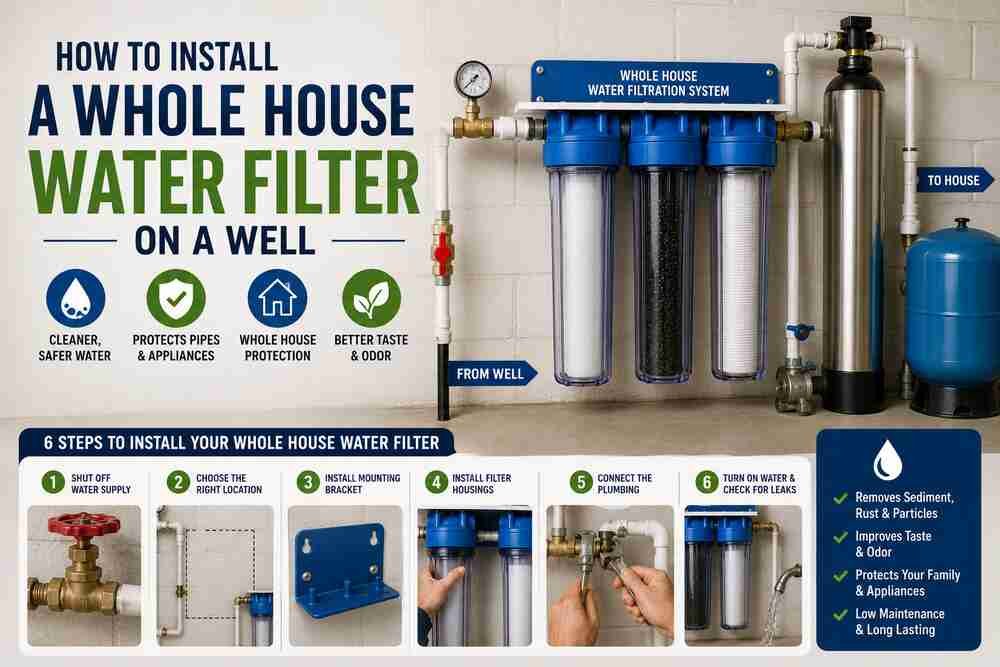
The EPA classifies whole-house systems as point-of-entry (POE) treatment devices, installed to treat all water entering a home. Point-of-use (POU) devices, like an under-sink filter, only treat water at a single tap. According to the EPA’s guide to point-of-use and point-of-entry treatment devices, POE systems typically include a particulate pre-filter, one or more treatment vessels, and a bypass valve so the household still has water during servicing.
Well water in particular tends to carry sediment, iron, manganese, and hardness minerals that municipal water rarely does, since it isn’t pre-treated before it reaches your pressure tank. A whole-house filter addresses all of that at once, which protects your water heater, dishwasher, and washing machine from scale and sediment buildup, in addition to improving the water at every tap.
Before You Install: Test Your Water and Choose the Right System
Don’t buy a filter before you know what you’re filtering out. The CDC’s guidance on choosing home water filters is direct: test your water first, then choose a filter that removes the specific contaminants you’re concerned about. A filter that removes germs often won’t remove chemicals, and vice versa.
Pore size (measured in microns) matters more than most buyers realize. The CDC notes that filtering out parasites requires a 1-micron absolute pore size or an NSF Standard 53/58 certification, while bacteria require 0.3 microns or smaller. Look for NSF certification labels on any system you’re considering: Standard 42 covers taste and odor, 53 covers cyst and contaminant reduction, and 58 covers reverse osmosis.
Beyond filtration ability, match the system’s flow rate (measured in gallons per minute) to your household’s peak demand, so water pressure doesn’t drop when multiple fixtures run at once. A typical single-family home needs a filter rated for at least 7–10 GPM.
Where to Install the Filter
Most whole-house filters go between the pressure tank and the point where the main line splits off to the water heater and the rest of the house, so both hot and cold water get filtered. Keep these placement factors in mind:
- Indoor vs. outdoor: Indoor installations (basement, utility room, or crawlspace) protect the housing from freezing, which matters in most U.S. climates. Outdoor installations need a freeze-proof enclosure.
- Clearance for cartridge changes: Leave enough room below the housing to twist off and remove the filter canister without disconnecting the plumbing.
- Accessibility: Install it somewhere you’ll actually check regularly. A filter buried behind stored boxes tends to get neglected.
Step-by-Step: How to Install a Whole-House Water Filter on a Well
Once you’ve chosen a system and a location, the installation itself follows six main steps.
Step 1: Identify Your Install Location
Confirm the spot on the main line, ideally right after the pressure tank and before the water heater, following the placement guidance above.
Step 2: Shut Off and Drain the System
Cut power to the well pump, then shut off the main water supply. Open the lowest faucet in the house or a drain valve near the pressure tank to release pressure and drain the line you’ll be cutting into.
Step 3: Cut the Pipe
Using a pipe cutter, cut the main line at your chosen location. Leave enough clearance below the cut for the filter housing and enough room to swap cartridges later. Dry-fit the housing before making any permanent connections.
Step 4: Attach the Fittings and Bypass Valve
Most whole-house systems include compression fittings and a bypass valve. The bypass valve is worth the extra step: it lets you route water around the filter during cartridge changes or repairs without cutting off water to the whole house.
Step 5: Mount and Position the Filter Housing
Secure the housing to a wall bracket or stand so it doesn’t hang from the pipes alone. Make sure water flows through the port marked “in” and out through the port marked “out” — installing it backward is a common mistake that either blocks flow entirely or bypasses filtration altogether. Hand-tighten the compression nuts until the housing sits straight and doesn’t wobble.
Step 6: Turn the Water Back On and Check for Leaks
Restore power to the well pump and slowly turn the main water supply back on. Check every fitting for drips before you walk away, and run a few faucets to bleed air out of the lines. Once everything looks dry and pressure is stable, switch the bypass valve to the “filter” position so water starts running through the cartridge.
The video below from This Old House walks through a full whole-house filter installation and is a useful visual reference alongside the steps above.
How Long Does Installation Take?
Timing depends heavily on who’s doing the work and how accessible your plumbing is. A licensed plumber with the right tools on hand usually finishes in about three hours. A confident first-time DIYer should budget closer to four to six hours, factoring in trips to the hardware store for fittings you didn’t realize you’d need. Homes with tight crawlspace access or older galvanized plumbing tend to take longer regardless of who’s doing the work.
Maintenance: Keeping Your Whole-House Filter Working
Installing the filter is only half the job. Sediment pre-filters on well water typically need replacing every 1 to 3 months, since well water usually carries more particulate than treated municipal supplies. Carbon or specialty media (for iron, sulfur, or tannins) often lasts 6 to 12 months, depending on your water quality and household usage. Check your manufacturer’s guidelines, and replace cartridges sooner if you notice a drop in water pressure, since that usually signals a clogged filter. This is exactly when the bypass valve you installed pays off, letting you swap cartridges without shutting off water to the whole house.
DIY vs. Hiring a Licensed Plumber
Installing a whole-house filter is a moderately involved plumbing project, not an advanced one, so many homeowners handle it themselves with basic tools (a pipe cutter, wrench, and Teflon tape). That said, hiring a licensed plumber makes sense if your home has older galvanized pipe, a complex well setup, or if local code requires a permit for plumbing modifications, which some U.S. municipalities do. Professional installation typically runs $150–$400 in labor, on top of the cost of the filter system itself, but it also usually comes with a workmanship warranty that DIY installation doesn’t.
If you’re still deciding which system to buy before installing anything, our drinking water filtration system reviews and buyer’s guide and tips for buying the best water purifier can help you narrow down options before you start cutting pipe. If you haven’t tested your well yet, start with our guide on how to purify well water for drinking safely, which covers testing frequency and what to test for.

Benefits of a Whole-House Water Filter on Well Water
- Whole-home protection: Every tap, shower, and appliance gets filtered water, not just the kitchen sink.
- Appliance longevity: Reduced sediment and scale buildup extends the life of your water heater, dishwasher, and washing machine.
- Lower bottled water costs: Clean-tasting tap water at every fixture reduces the need to buy bottled water.
- Better skin and laundry results: Removing sediment and iron staining improves how water feels in the shower and how clothes and dishes come out.
A whole-house filter handles sediment, chlorine taste, and general clarity, but it typically doesn’t soften hard water or provide the final polish some households want for drinking water. If your test shows high hardness, pair it with a system from our best water softener for well water guide. And if you want a no-cost way to test DIY filtration before committing to a full install, our guide on how to make a water filtering system in your house covers simple backup methods.
Frequently Asked Questions
Do I need a permit to install a whole-house water filter on a well?
It depends on your municipality. Some areas require a permit for any plumbing modification, while others don’t regulate point-of-entry filter installation at all. Check with your local building department before you start, especially if you plan to sell the home eventually and want the work on record.
Will a whole-house filter reduce my water pressure?
A properly sized filter, matched to your household’s peak flow rate, shouldn’t cause a noticeable pressure drop. An undersized filter or a clogged, overdue cartridge will. If you notice reduced pressure after installation, check the flow rate rating first and the cartridge age second.
Can I install a whole-house filter myself without plumbing experience?
Basic installations on accessible, modern plumbing are within reach for most confident DIYers using a pipe cutter, wrench, and the manufacturer’s instructions. If your plumbing is older, hard to access, or you’re not comfortable working with pressurized water lines, hiring a licensed plumber is the safer route.
How is a whole-house filter different from a water softener?
A whole-house filter removes sediment, chlorine, and some chemical contaminants, while a water softener specifically targets calcium and magnesium hardness through ion exchange. Many well-water households install both in sequence: sediment filter first, softener second, since sediment can clog a softener’s resin bed over time.
Do I still need a separate drinking water filter after installing a whole-house system?
Many households pair a whole-house filter with a dedicated under-sink or reverse osmosis system at the kitchen tap. The whole-house unit handles sediment and general water quality throughout the home, while a point-of-use system provides an extra layer of filtration specifically for water you drink and cook with.
Final Thoughts
Learning how to install a whole-house water filter on a well pays off in cleaner water at every tap, less strain on your appliances, and fewer surprises about what’s actually in your water. Test first, size the system to your household’s flow rate and contaminants, install a bypass valve so future maintenance doesn’t shut off your whole house, and stay on top of cartridge changes. Whether you tackle it yourself over a weekend or bring in a licensed plumber, the result is the same: water you don’t have to think twice about.

Hey, My name is MAMON. I am a SEO content creator and affiliate marketer with over 8 years of experience. I create honest product reviews, in-depth buying guides, and practical how-to articles to help readers make informed decisions. My mission is to provide trustworthy, research-backed content that delivers real value.
Leave a Reply