 If you love fresh bread but struggle to make it from scratch, you’re not alone. Many people want homemade bread but worry about the time, skill, and mess. Bread makers solve this problem by making the process simple and automatic. These machines help you bake bread with very little effort, even if you have never baked before. Understanding how does a bread maker work can help you decide if it’s right for your kitchen, where to store bread in the kitchen after baking, and how this appliance turns basic ingredients into delicious loaves.
What Is A Bread Maker?
A bread maker is a kitchen machine designed to bake bread automatically. You add ingredients, select a program, and let the machine do the rest. The bread maker mixes, kneads, rises, and bakes the dough inside one container. Most bread makers are compact, about the size of a small microwave, and fit on your countertop.
Bread makers first became popular in the 1980s, and today many homes have one. They are especially helpful for busy families, people with allergies, and anyone who wants to control what goes into their bread. You can bake classic white bread, whole wheat, gluten-free, or even jam and cake.
The Main Parts Of A Bread Maker
To understand how a bread maker works, let’s look at its key parts:
- Bread pan: The removable container where the dough is mixed and baked.
- Kneading paddle: A metal blade at the bottom of the pan that mixes and kneads the dough.
- Heating element: The part that heats the pan and bakes the bread.
- Control panel: Buttons or touchscreen for choosing programs and settings.
- Lid: Covers the pan and usually has a window to see the bread baking.
- Motor: Powers the kneading paddle.
These parts work together to turn raw ingredients into a finished loaf. Some bread makers also have extra features like a dispenser for nuts or fruit and a timer for delayed baking.
Step-by-step: How does a bread maker work
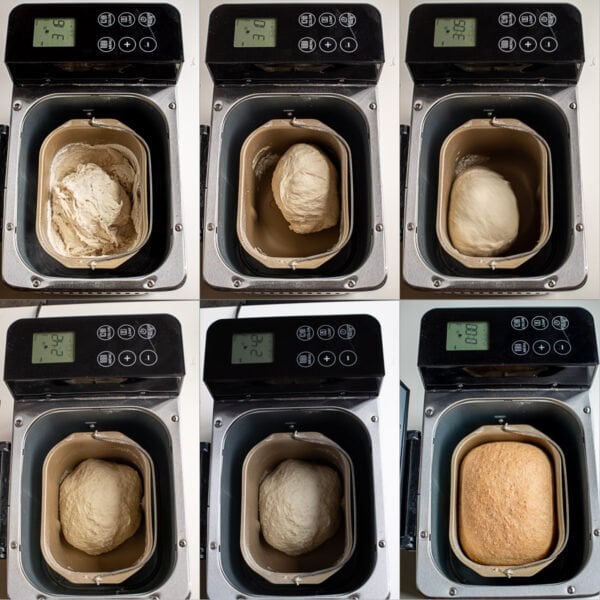
Bread makers follow a series of steps to bake bread. Each step is automated, so you don’t need to watch over the machine. Here’s what happens inside:
1. Mixing
You start by adding ingredients to the bread pan. Common ingredients are flour, water, yeast, salt, sugar, and fat (like butter or oil). The kneading paddle spins and mixes everything together. The machine makes sure the dough is well-blended and smooth.
2. Kneading
After mixing, the paddle kneads the dough. Kneading is important—it builds gluten and gives bread its texture. The bread maker kneads for 10–20 minutes, depending on the recipe. The motor turns the paddle, and the dough is pressed and folded.
3. Rising (proofing)
Once kneading is finished, the dough rests and rises. The bread maker keeps the pan warm so the yeast can work. The dough doubles in size and becomes light and airy. This stage usually lasts 30–60 minutes.
4. Punch Down And Second Rise
Some bread makers punch the dough down to release air and then let it rise again. This step helps with texture and shape. Not all bread recipes need this step, but many machines include it.
5. Baking
The heating element turns on and bakes the bread. The machine controls the temperature and time. The bread pan gets hot, and the dough cooks into a golden loaf. Baking usually takes 40–60 minutes.
6. Cooling
When baking is finished, the machine may beep or turn off. Some bread makers let the bread cool inside, while others need you to remove it right away. Cooling is important so the bread doesn’t get soggy.
7. Removing The Bread
You take out the bread pan, turn it upside down, and the loaf slides out. Sometimes the kneading paddle stays inside the loaf; you can pull it out.
This whole process takes 2–4 hours, depending on the recipe and settings.
Key Bread Maker Programs And Settings
Bread makers come with different programs for various types of bread and dough. Here are the most common options:
- Basic/White Bread: For classic loaves
- Whole Wheat: Uses longer kneading and rising
- French Bread: Longer bake, crisp crust
- Sweet Bread: For bread with sugar or fruit
- Rapid/Express: Shorter time, faster bread
- Dough: Mixes and kneads only (for pizza or rolls)
- Jam: Cooks fruit and sugar into jam
- Cake: Mixes and bakes cake batter
- Gluten-Free: Special process for gluten-free flours
You select the program using the control panel. Some bread makers let you adjust loaf size, crust color (light, medium, dark), and delay timer so bread is ready when you want.
Credit: letthebakingbegin.com
Bread Maker Vs Traditional Baking
Is a bread maker better than baking by hand? Let’s compare the two methods:
| Feature | Bread Maker | Traditional Baking |
|---|---|---|
| Mixing & Kneading | Automatic | Manual, requires skill |
| Time | 2–4 hours, mostly hands-off | 3–5 hours, hands-on |
| Consistency | Uniform, reliable | Varies, depends on baker |
| Customization | Limited by machine | Highly flexible |
| Cleaning | Easy, one pan | Multiple bowls, tools |
Bread makers are much easier for beginners. However, traditional baking allows more flexibility and control, especially for advanced recipes.
Common Bread Maker Recipes
Bread makers can do more than just plain bread. Here are some popular recipes:
- Basic white bread: Simple, soft loaf
- Whole wheat bread: Nutty, healthy
- Gluten-free bread: For allergies
- Sweet bread: With raisins or cinnamon
- Pizza dough: Ready for baking
- Jam: Homemade fruit spread
- Cake: Moist, easy dessert
Each recipe uses a different program, but the bread maker handles the steps. For example, gluten-free bread needs more mixing and less rising. Sweet bread may require adding fruit halfway through.
Bread Maker Ingredients: What Matters Most
Bread makers need precise ingredients. Here’s what to consider:
- Flour: Bread flour is best; it has more gluten for structure.
- Yeast: Use instant or bread machine yeast; regular yeast may be too slow.
- Salt: Controls flavor and yeast activity.
- Sugar: Feeds yeast, adds sweetness.
- Fat: Butter or oil makes bread soft.
- Water/Milk: Moistens dough, helps yeast.
Tip: Always measure ingredients carefully. Too much or too little can ruin the loaf. For best results, use fresh yeast and flour.
The Science Behind Bread Making
A bread maker uses a blend of science and automation. Yeast is the star—it eats sugar and produces carbon dioxide, making the dough rise. Gluten, from the flour, forms a stretchy network. Kneading strengthens gluten, giving bread its chewy texture.
The heating element bakes the dough, causing the crust to form. Moisture evaporates, and the loaf turns golden. Most machines sense temperature and adjust as needed.
Non-obvious insight: Humidity and altitude can affect bread making. If you live at high altitude or in a humid place, you may need to adjust water or flour.
Bread Maker Limitations
Bread makers are convenient but have some drawbacks:
- Loaf shape: Most bread makers produce a tall, square loaf, not a classic round.
- Crust: Crust may be thicker or softer than oven-baked bread.
- Size: Limited to the pan’s capacity (usually 1–2 pounds).
- Mix-ins: Adding nuts, seeds, or fruit may require timing or manual steps.
Some breads—like sourdough—are difficult in a bread maker because they need special fermentation. Also, bread makers can’t always make artisan-style crusts.
Bread Maker Maintenance And Cleaning
Keeping your bread maker clean is important for good bread and longer machine life. Here’s how:
- Bread pan: Wash with warm water and mild soap. Avoid harsh scrubbing.
- Kneading paddle: Remove and clean after each use.
- Exterior: Wipe with a damp cloth.
- Heating element: Never touch; let the machine cool before cleaning.
Non-obvious tip: Sometimes dough sticks to the pan. Lightly oiling the pan before baking can help.
Bread Maker Features To Consider When Buying
If you’re thinking of buying a bread maker, compare these features:
| Feature | Why It Matters |
|---|---|
| Loaf size | Choose based on family size (1–2 lb) |
| Crust settings | Light, medium, dark options |
| Programs | More programs mean more recipe options |
| Delay timer | Allows baking overnight or while you’re away |
| Mix-in dispenser | Adds nuts or fruit automatically |
| Removable pan | Easier cleaning |
| Price | Ranges from $60 to $300 |
| Warranty | Protects against defects |
Common buyer mistake: Choosing a machine with too few programs or a small loaf size. Think about how much bread you eat and whether you want to bake gluten-free or specialty breads.
Comparing Popular Bread Maker Brands
There are many brands of bread makers, each with strengths. Here is a comparison of three top models:
| Brand/Model | Loaf Size | Programs | Price Range | Special Features |
|---|---|---|---|---|
| Zojirushi Home Bakery | 1–2 lb | 15 | $250–$300 | Dual paddles, customizable cycles |
| Panasonic SD-YD250 | 1.5–2.5 lb | 12 | $130–$160 | Yeast dispenser, delay timer |
| Hamilton Beach Artisan | 1–2 lb | 14 | $60–$80 | Gluten-free setting, quick bake |
Tip: Read customer reviews before buying. Some machines are quieter, others produce better crust, and some have easier cleaning.
Bread Maker Troubleshooting
Sometimes bread makers produce loaves that are too dense, collapse, or don’t rise. Here are common problems and fixes:
- Dense bread: Check flour type and yeast freshness.
- Collapsed loaf: Too much water or yeast; check measurements.
- No rise: Yeast dead or water too hot/cold.
- Sticky dough: Too much moisture; add flour.
- Pale crust: Try darker crust setting.
Non-obvious insight: The temperature of your kitchen affects yeast. Cold rooms slow rising; warm rooms speed it up.
Bread Makers For Special Diets
Bread makers can help with special diets:
- Gluten-free: Use gluten-free flour and special programs.
- Low-salt: Adjust salt levels for heart health.
- Vegan: Replace butter with oil, avoid eggs.
This flexibility is useful for allergies and health needs. You control every ingredient, which is not possible with store-bought bread.
If you want to learn more about making gluten-free bread, visit our internal guide on [gluten-free baking basics](https://yourwebsite.com/gluten-free-baking-basics).
Bread Maker Safety Tips
Bread makers are generally safe, but follow these tips:
- Keep the machine away from water.
- Don’t touch hot surfaces during baking.
- Unplug after use.
- Use on a flat, stable surface.
- Supervise children.
If you follow these tips, your bread maker will last longer and you’ll avoid accidents.
The Future Of Bread Makers
Modern bread makers are getting smarter. Some have Wi-Fi and connect to apps for recipes and control. Others use sensors to adjust baking for perfect results. Manufacturers are making quieter motors and more stylish designs.
Research shows bread makers are popular in homes with busy schedules and health concerns. In 2026, about 1 in 5 US households owned a bread maker, and sales keep growing.
If you want more data, check this Wikipedia article for history and stats.
Frequently Asked Questions
How Long Does It Take To Bake Bread In A Bread Maker?
Most bread makers bake a loaf in 2–4 hours. Rapid programs can finish in 1–1. 5 hours, but the texture may be less chewy.
Can I Use Regular Flour In A Bread Maker?
You can use regular flour, but bread flour works best because it has more gluten. This gives bread better texture and rise.
Why Does My Bread Maker Bread Sometimes Turn Out Dense?
Dense bread is often caused by old yeast, not enough water, or using all-purpose flour instead of bread flour. Double-check your measurements and use fresh yeast.
Can I Make Other Foods In A Bread Maker?
Yes! Many bread makers can make dough for pizza, cakes, and even jam. Some models have special programs for these foods.
Is Homemade Bread Healthier Than Store-bought?
Homemade bread can be healthier because you control the ingredients. You can avoid preservatives, reduce salt, and add healthy grains or seeds.
Bread makers are a great tool for anyone who wants fresh bread without the hassle. They make baking simple, reliable, and fun. With the right machine, you can bake dozens of recipes and adjust ingredients for your needs. Whether you’re a beginner or an experienced baker, understanding how a bread maker works can help you make better bread at home and enjoy the taste of fresh, homemade loaves.

Hey, My name is MAMON. I am a SEO content creator and affiliate marketer with over 8 years of experience. I create honest product reviews, in-depth buying guides, and practical how-to articles to help readers make informed decisions. My mission is to provide trustworthy, research-backed content that delivers real value.
Leave a Reply