Introduction
If water pressure from your Delta kitchen faucet has dropped off, or the spray comes out uneven, the head is probably clogged with mineral buildup. Knowing how to clean a Delta kitchen faucet head properly restores full flow in about 15 minutes, and it’s a job you can repeat every few months without any special plumbing skills.
This guide walks through why the buildup happens, the tools you need, and the exact steps for both the standard aerator and the pull-down sprayer head Delta uses on many of its kitchen models.
Key Takeaways
- Delta’s own support documentation recommends soaking the aerator in white vinegar overnight, then scrubbing stubborn spots with a toothbrush (Delta Faucet).
- Most Delta aerators use a cache (recessed) design that needs a small aerator key rather than a wrench.
- Cleaning faucet aerators every 6 months, or after any plumbing work on the home, helps prevent flow issues and keeps debris from accumulating (Health Canada).
- For a pull-down sprayer head, submerging it in a bag of vinegar works better than trying to remove the aerator alone.
Why Clean a Delta Kitchen Faucet Head Regularly?
Every kitchen faucet, including higher-end options like a gold kitchen faucet, accumulates mineral deposits over time. Tap water carries dissolved calcium and magnesium, and as water passes through the aerator’s fine mesh screen, those minerals gradually build up on the surfaces.
That buildup does two things: it narrows the tiny holes the aerator uses to mix air into the water stream, which cuts flow rate, and it gives debris and sediment somewhere to collect. Health Canada’s guidance on faucet aerator maintenance recommends cleaning them out roughly every six months, or any time plumbing work has been done on the house, since installation debris like solder or thread tape can get trapped in the screen even in a newly installed faucet.
Tools You’ll Need
- White vinegar (enough to fully submerge the aerator or sprayer head)
- A small bowl or a sealable plastic bag
- An old toothbrush
- A cloth or rag to protect the faucet finish
- An aerator key, if your faucet has a recessed (cached) aerator
- Channel-lock pliers or an adjustable wrench, wrapped in cloth to avoid scratching the finish
Cleaning the Faucet Body and Finish
While you’re in there, it’s worth giving the visible parts of the faucet the same attention. Delta’s own care guidance is straightforward: clean the surface with a damp, non-abrasive sponge, then buff it dry with a soft cloth. For water spots, warm water and a soft cloth usually do the job.
For hard water stains on the finish itself, a 50/50 solution of white vinegar and water works the same way it does inside the aerator, though Delta specifically recommends rinsing the surface thoroughly with clean water afterward to prevent the vinegar from sitting on the finish. Avoid abrasive scrubbers, steel wool, or harsh chemical cleaners on any faucet finish, since they can dull or scratch the coating permanently, something no amount of cleaning will fix afterward.
One habit that prevents most of this buildup in the first place: blot the faucet dry after use instead of letting water evaporate on the surface. Standing water that evaporates leaves mineral residue behind, which is exactly how those white spots accumulate on a finish over time.
Cached vs. Standard Aerators
Not every Delta faucet uses the same aerator design, and knowing which one you have changes your approach before you start.
- Cached (recessed) aerators sit below the surface of the spout opening and require the small plastic aerator key that notches into the aerator’s circumference. Most modern Delta kitchen faucets use this design.
- Standard aerators thread onto the outside of the spout and can be removed with fingers or a wrench wrapped in cloth, similar to older or non-Delta faucets.
If you’re not sure which type you have, look at the end of the spout. A cached aerator sits flush or recessed, with no visible threads to grip from outside; a standard one has a visible threaded ring you can turn directly.
How to Clean a Delta Kitchen Faucet Aerator
Most Delta kitchen faucet heads use what’s called a cached aerator, a recessed design you can’t grip with a standard wrench. Look closely at the faucet spout and you’ll see small notches around the aerator’s circumference; a cylindrical aerator key fits those notches and lets you turn it by hand or with light leverage.
- Remove the aerator. Fit the key into the notches and twist counterclockwise. If you don’t have a key, try turning it by hand first; many aerators loosen without one.
- Lay out the pieces in order. As you disassemble it, note the position of each gasket and screen so reassembly goes back together correctly. Taking a quick photo before you start helps.
- Rinse off loose debris. Turn the aerator over and rinse it under running water to knock loose any large particles first.
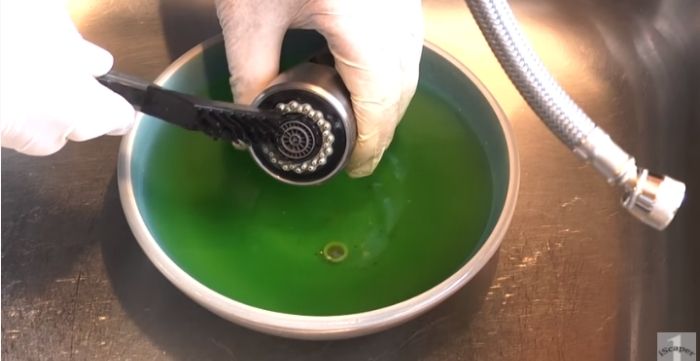
- Soak in vinegar. Submerge the aerator and its components in undiluted or lightly diluted white vinegar. Delta’s own cleaning guidance calls for an overnight soak for mineral deposits, though a few hours will handle lighter buildup.
- Scrub stubborn spots. After soaking, use the toothbrush to work vinegar into the mesh screen and any visibly crusted areas.
- Rinse thoroughly. Flush every piece under clean water before reassembling, since leftover vinegar residue can affect taste.
- Reassemble and reinstall. Put the gaskets and screen back in their original order, then hand-tighten the aerator back into the spout.
Cleaning a Delta Pull-Down Sprayer Head
If your Delta faucet has a pull-down or pull-out sprayer instead of a fixed aerator, removing the whole head for cleaning is trickier since it retracts back into the hose. This method skips disassembly entirely:
- Pull the sprayer head out to its full extension and clamp the hose (a spring clamp or clothespin works) so it can’t retract while you work.
- Fill a sealable plastic bag with enough white vinegar to fully submerge the head.
- Slide the bag up over the sprayer head and tie or twist it closed around the neck, making sure the entire head sits below the vinegar line.
- Let it soak for several hours, or overnight for heavier buildup.
- Remove the bag, then rinse the head thoroughly under running water before releasing the clamp.
An Alternative Cleaning Method: Cola
If you’re out of vinegar, some people use regular cola as a substitute since it contains phosphoric acid, which can help break down mineral deposits the same way vinegar’s acetic acid does. Fill a bag with cola and submerge the head the same way you would with vinegar, then rinse thoroughly afterward, since cola is sugary and will leave a sticky residue if not fully rinsed away. Vinegar remains the method Delta’s own documentation recommends, so treat cola as a backup rather than a first choice.
How Vinegar Actually Cleans the Aerator
White vinegar’s acetic acid dissolves calcium and magnesium mineral deposits on contact, which is exactly the scale buildup clogging the aerator’s mesh screen. That’s the primary reason it works for this job: it’s a mild, food-safe acid that breaks down mineral crust without damaging the aerator’s plastic and metal components. It also helps loosen grease and general grime stuck in the mesh, making the toothbrush scrub in step 5 more effective.
How Often Should You Clean It?
A general rule of thumb is every 3 to 6 months for normal household water, more often if you’re on a well or in an area with notably hard water. Watch for these signs that it’s time sooner:
- Water pressure has visibly dropped
- Spray pattern is uneven or shoots off at an angle
- Water sputters instead of flowing smoothly
- Visible white or greenish crust around the spout opening
Preventing Buildup Between Cleanings
- Wipe down the faucet spout and aerator opening after use if you have hard water, since mineral deposits build up faster on surfaces that dry with water still on them.
- Consider a whole-house or under-sink water softener if hard water is a persistent problem throughout your home.
- If you’re shopping for a new faucet and expect to deal with hard water, a touch kitchen faucet with a removable aerator design makes future cleanings faster.
FAQ
How do I remove a Delta faucet aerator without a key?
Try turning it counterclockwise by hand first; many loosen without tools. If it won’t budge, wrap it in a cloth and use channel-lock pliers or an adjustable wrench with gentle pressure to avoid scratching the finish.
How long should I soak the aerator in vinegar?
Delta’s own guidance recommends an overnight soak for mineral deposits. A few hours will handle lighter buildup, but overnight gives the acetic acid more time to dissolve stubborn scale.
Can I use cola instead of vinegar to clean a faucet head?
Yes, cola’s phosphoric acid works similarly to vinegar’s acetic acid on mineral deposits. Rinse thoroughly afterward since cola leaves a sticky, sugary residue if not fully flushed out.
Why does my Delta faucet have low water pressure even after cleaning?
If cleaning the aerator doesn’t restore pressure, check the water supply lines for kinks or a partially closed shutoff valve, and consider whether your home’s water pressure has changed for other reasons.
How do I clean a Delta pull-down sprayer head?
Extend the sprayer fully, clamp the hose so it can’t retract, then submerge the head in a bag of white vinegar for several hours before rinsing thoroughly.
Will cleaning the aerator damage my faucet’s finish?
No, as long as you avoid abrasive scrubbers or steel wool on the visible finish. Vinegar soaking is safe for the aerator’s internal plastic and metal parts; just rinse the outer finish promptly if any vinegar solution splashes on it.
Conclusion
A clogged Delta kitchen faucet head is one of the easiest plumbing fixes there is: remove the aerator or bag the sprayer head, soak it in white vinegar, scrub, and rinse. Doing this every few months keeps water flow strong and prevents the kind of mineral buildup that eventually requires replacing the whole aerator. Keep a bottle of white vinegar under the sink and it’s a five-minute task whenever flow starts to dip.

Hey, My name is MAMON. I am a SEO content creator and affiliate marketer with over 8 years of experience. I create honest product reviews, in-depth buying guides, and practical how-to articles to help readers make informed decisions. My mission is to provide trustworthy, research-backed content that delivers real value.
Leave a Reply