

It was a Saturday morning, and Sarah, a busy working mom, noticed a drip under her kitchen sink. She decided to fix it herself. Sarah was ready to learn and tackle the DIY plumbing challenge.
Kitchen sink plumbing is key to your home’s function. Fixing leaks, corrosion, or old parts is important. This guide will help you fix and replace your kitchen sink’s plumbing.


Key Takeaways
- Replacing pipes under a kitchen sink is a common DIY repair project for homeowners.
- The P-trap is a critical component that serves as a barrier against sewer gases and prevents clogs.
- Proper tools and materials are essential for a successful pipe replacement, including slip joint pliers, pipe lubricant, and sealants.
- Following safety precautions and preparation steps is crucial before starting the project.
- Careful installation of the new P-trap and drain assembly is key to preventing leaks and ensuring a secure connection.
Understanding Your Kitchen Sink Plumbing System
To keep your kitchen sink working right, knowing the parts of the plumbing system is key. The P-trap, or sink trap, is a curved pipe that holds water. This stops sewer gases from getting into your home. It also catches things that could block your drain.
Problems like leaks, corrosion, and slow drains are common. These can make your kitchen sink not work well.
Basic Components of Under-Sink Plumbing
The plumbing system under your kitchen sink includes the P-trap, drain assembly, and supply lines. PVC pipes are often used because they last long and are cheap. But, if metal pipes corrode, they might need to be replaced.
It’s a good idea to check your plumbing under the sink at least once a year. This helps find problems early.
Common Signs of Pipe Problems
- Clogged drains
- Leaking pipes
- Slow water flow
- Foul odors
- Deteriorating pipes
Types of Pipes and Materials
Kitchen sink pipes can be made from PVC, metal, and other materials. PVC is popular because it’s durable and affordable. If your metal pipes are old and causing problems, it’s best to replace them.
“Inspecting and replacing worn out or damaged sink components helps ensure the longevity of a kitchen sink plumbing system.”
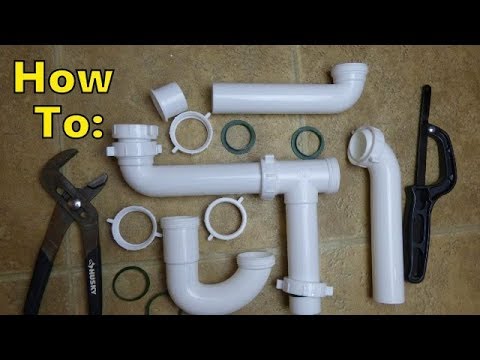
Essential Tools and Materials Needed
Replacing the pipes under your kitchen sink needs the right plumbing tools and pipe replacement materials. Having these essentials will make the job easier and ensure success.
You’ll need an adjustable wrench, a pipe cutter or hacksaw, pliers, a screwdriver, and a measuring tape. For materials, get new pipes, a P-trap, fittings, plumber’s tape or putty, and a bucket for water. If your sink has two basins, a continuous waste T-fitting is also needed.
Pipe lubricant can help with installation, making the new pipes fit tightly. A basin wrench is useful for working in tight spaces under the sink.
| Tools | Materials |
|---|---|
|
|
With these plumbing tools and pipe replacement materials, you’re ready to replace the pipes under your kitchen sink.
Safety Precautions and Preparation Steps
Before starting your kitchen sink plumbing project, it’s key to take safety steps and prepare your space. This ensures a smooth process and keeps you and your home safe.
Shutting Off Water Supply
First, find the water shut-off valve under your kitchen sink. Turn it clockwise to cut off the water supply. This stops any leaks or flooding during the replacement.
Clearing the Workspace
Then, clear the area under the sink. Remove all items like cleaning supplies and utensils. This gives you room to work and access the plumbing without trouble. Put a bucket or tray under the sink to catch any water that might spill.
Emergency Measures
Know where your home’s main water shut-off valve is. If problems arise, you’ll need to turn off the main water supply quickly to avoid more damage.
By taking these safety steps and preparing, you’re ready for a successful kitchen sink pipe replacement. This reduces the risk of accidents and makes the process smoother and more efficient.


How to Replace Pipes Under Kitchen Sink
Replacing pipes under your kitchen sink is easy for DIY fans. Just be careful with measurements, alignment, and sealing to avoid leaks. Here’s how to do it step by step.
- Start by taking apart the leaky section with an adjustable wrench. For rusty spots, use WD-40 to help loosen the parts.
- Measure the pipes carefully, noting their size and length. This helps you buy the right parts.
- Use a pipe cutter or hacksaw to cut out the old pipes. Be careful not to damage anything nearby.
- Do a “dry fit” of the new pipes before installing them. This lets you make any needed adjustments.
- Apply plumber’s tape or putty to the threads for a tight seal. Then, put the new pipes together carefully.
Always put safety first when replacing pipes. Wear eye protection and gloves. Also, make sure the water is turned off to avoid leaks or floods.
“The key to a successful pipe replacement is taking the time to measure, fit, and seal the new components properly. This will save you from future headaches and water damage.”
By following these steps, you can replace the pipes under your kitchen sink. This will make your plumbing system work better. With some patience and care, you can have a leak-free kitchen sink for many years.

Installing the P-Trap and Drain Assembly
Installing the P-trap and drain assembly is key for a working kitchen sink. It keeps sewer gas out of your home. This process needs careful steps and the right alignment. Learn about P-trap installation, drain connections, and sealing.
P-Trap Installation Steps
- First, attach the tailpiece to the sink strainer. For double-basin sinks, use a continuous waste T-fitting.
- Then, connect the trap arm to the drain stub-out with slip nuts and washers. Make sure the beveled sides face the threads.
- Attach the trap bend to the trap arm, tightening all connections with slip joint pliers.
- Don’t use Teflon tape on white plastic pipe threads and fittings. It can cause leaks over time.
Proper Alignment Techniques
Aligning the P-trap and drain assembly is key to avoid leaks and ensure drainage. Spend time adjusting until they’re level and securely connected. This ensures a lasting, efficient plumbing system under your kitchen sink.
Sealing and Connection Methods
After installing, seal all connections to prevent leaks. Use plumber’s putty or silicone sealant around the sink strainer and threaded joints. Tighten the slip nuts on the trap arm and bend securely, but don’t overdo it.

“A properly installed P-trap is not only essential for maintaining a well-functioning kitchen sink, but also helps to protect your home from the hazards of sewer gas. Taking the time to get it right can save you a lot of headaches down the line.”
By following these guidelines, you can ensure your kitchen sink plumbing is reliable and up to code. Remember to test the system and fix any leaks or issues before finishing the project.
Connecting Water Supply Lines
Connecting the water supply lines is key when replacing pipes under your kitchen sink. It makes sure the faucet and water source are securely linked without leaks. Let’s explore the details:
- Attach the flexible supply lines to the faucet tailpieces. These lines are flexible, making them easy to connect.
- Use acorn-head supply tubes or braided stainless steel hoses to connect the faucet to shut-off valves. Tighten with an adjustable wrench, but avoid over-tightening.
- For faucets with a separate sprayer, thread the tail pipe by attaching the hose to the faucet’s threaded tailpiece. This setup allows the sprayer to function correctly and adds convenience for a smoother kitchen or bathroom experience.
It’s vital to tighten all connections well to avoid leaks. Also, using the right plumbing fittings, like Teflon tape or plumber’s putty, helps seal everything tightly.
“Replacing the water supply lines under the kitchen sink can be a cost-effective DIY project, saving you from the expense of hiring a plumber.”
After finishing the connections, turn on the water faucet and check for leaks. This confirms the water supply connections are sealed and working right. If you find any leaks, tighten the connections or get help from a professional plumber.

By following these steps, you can connect the water supply lines well. This will make your kitchen sink plumbing system work smoothly. With the right tools and care, you can do this project confidently. Enjoy a leak-free, functional kitchen sink for many years.
Testing and Troubleshooting Common Issues
After putting in new pipes under your kitchen sink, it’s key to check the plumbing system well. Start by turning on the water and looking for any plumbing leaks at the connections. Run the water full blast to see if there are any problems.
One good way to find leaks is to use a dry paper towel under the pipes. If it gets damp, there’s a leak. If you see leaks, try tightening the connections a bit at a time to avoid over-tightening.
Pressure Testing
To do a water pressure test, fill the sink and watch how the water drains. If it drains slowly or not at all, there might be a pipe or drain problem. Fix any leaks or drainage issues right away to avoid more damage and water waste.
Quick Fixes for Common Problems
- Clogged drains: Use a plunger or a homemade cleaner with vinegar and baking soda to fix pipe troubles.
- Low water pressure: Look for kinks or blockages in the supply lines and make sure the shut-off valves are open.
- Leaky faucets: Tighten the connections or replace old washers and gaskets to stop leaks.
If you can’t fix a problem yourself, it’s wise to get a professional plumber. They can help solve the issue and make sure your kitchen sink plumbing works well for a long time.
| Common Plumbing Issues | Causes | Quick Fixes |
|---|---|---|
| Leaks under kitchen sink | Worn-out washers/gaskets, loose connections, corrosion, high water pressure | Tighten connections, replace washers/gaskets, apply plumbing tape |
| Slow draining sink | Debris and hair buildup in drain | Use a plunger or homemade drain cleaner |
| Low water pressure | Kinks or restrictions in supply lines, shut-off valves not fully open | Check and adjust supply lines and shut-off valves |
| Leaky faucets | Worn-out washers and gaskets | Tighten connections or replace washers and gaskets |
Maintenance Tips for New Plumbing
Keeping your kitchen’s plumbing system in good shape is key. It helps avoid expensive repairs later on. By following simple steps, you can keep your pipes and your kitchen kaucet working well. This reduces the chance of leaks, clogs, and other issues.
Inspect for Leaks
Check the pipes and connections under your sink often for leaks or corrosion. Fixing small leaks early can stop bigger, costlier problems.
Clean the P-Trap
The P-trap, a U-shaped pipe under your sink, stops sewer gases from getting in. It can get clogged with food and debris over time. Clean it out now and then to keep it working right.
Use Gentle Cleaning Products
Stay away from harsh chemical cleaners that can harm your pipes. Use gentle, enzyme-based cleaners or a mix of baking soda and vinegar instead. They help keep your drains clear and your pipes safe.
Protect the Sink Bottom
Put a sink grid or mat on your sink to prevent scratches and dents. These can lead to corrosion and leaks later on.
Maintain the Faucet Aerator
The faucet aerator at the end of your faucet can get clogged with minerals. Clean it every few months to keep water flowing well.
By following these tips, you can make your kitchen’s plumbing last longer and avoid expensive fixes. Fix any problems quickly to stop them from getting worse.
| Maintenance Task | Frequency | Benefit |
|---|---|---|
| Inspect for Leaks | Bi-annually | Prevents water damage and mold growth |
| Clean the P-Trap | Quarterly | Maintains proper function and prevents odors |
| Use Gentle Cleaners | As Needed | Protects pipes and fittings from damage |
| Install Sink Grid | One-time | Prevents sink bottom scratches and corrosion |
| Clean Faucet Aerator | Every 3-4 months | Maintains water pressure and flow |
“Proper maintenance is the key to ensuring your kitchen’s plumbing system operates smoothly and efficiently for years to come.”
Conclusion
Replacing pipes under your kitchen sink can be a DIY task if you’re well-prepared and have the right tools. But, if you face complex problems or feel unsure about plumbing, it’s wise to call a professional. Keeping up with maintenance and fixing small issues early can save you from expensive repairs later.
With the right DIY plumbing skills, quality materials, and safety in mind, you can replace pipes successfully. If you’d rather not do it yourself, professional plumbers can offer expert service. Either way, regular maintenance is key to keeping your home’s plumbing system in good shape.
This article has given you the confidence to handle your kitchen sink plumbing needs, whether DIY or professional. Remember, being proactive with maintenance and addressing issues quickly can protect your plumbing. This helps avoid costly water damage or other plumbing problems in the future.