


Key Takeaways
- A blender works as a backup coffee grinder in a pinch. Use short pulses instead of one long blend to avoid uneven, powdery results.
- Fast-spinning blades generate friction and heat. Coffee experts note that heat can affect flavor, so working quickly in bursts helps minimize it.
- Grind small batches, around half a cup of beans at a time. Tilt the blender as you pulse so beans near the top also reach the blades.
- Aim for a medium grind about the texture of kosher salt for most drip and pour-over brewing.
- Treat a blender as a real workaround, not a long-term replacement. A dedicated burr grinder will always deliver a more even grind.
Running out of ground coffee with no grinder in sight is a familiar problem. Maybe you’re traveling, your grinder just broke, or you never bought one in the first place. Before you resign yourself to a coffee-less morning, there’s good news. There’s a good chance the appliance sitting right on your counter can help. Most kitchens already have a blender. With the right technique, it can grind whole coffee beans well enough for a solid cup. Here’s exactly how to grind coffee beans in a blender, along with the tricks that keep the grind consistent and the beans from overheating.
Does a Blender Really Work as a Coffee Grinder?
Yes, with some caveats. A blender’s blades can chop whole beans down to a usable grind, but the results won’t match a dedicated grinder. According to coffee equipment maker Fellow, fast-spinning blades create friction and heat. That heat can be detrimental to flavor. Beans also bounce around unevenly inside the jar. That tends to produce a mix of fine powder and larger chunks rather than a uniform grind. That’s the same tradeoff you’d get from any blade-style grinder, blender included, since blade grinders work on the same basic principle. The upside is that a blender is something most people already own. With a few adjustments to technique, you can still get a grind that’s good enough for daily use.
What You’ll Need
- A standard countertop blender, or a personal-size blender like a NutriBullet or Ninja single-serve cup
- Whole coffee beans
- A measuring cup
- A spoon or small bowl to check grind consistency
If grinding by blender becomes a regular habit rather than an emergency fix, it’s worth considering a dedicated grinder instead. Our coffee grinder and brewer buyer’s guide compares options if you decide to make the switch.


Which Blenders Work Best for Grinding Coffee
Before we get into how to grind coffee beans in a blender step by step, it helps to know which type of blender you’re working with. Not every blender handles coffee beans equally well. High-powered blenders built for crushing ice and grinding grains, like Vitamix and Blendtec models, tend to produce a more even grind. Their motors maintain speed under load instead of bogging down. Personal blenders with a single-serve cup, such as a NutriBullet or Ninja’s smaller attachments, also work well. The tighter space forces beans toward the blades more consistently. Basic pitcher-style blenders can still get the job done. They just take more patience, since beans have more room to bounce around unevenly before making contact with the blades.
Step 1: Add a Small Batch of Beans
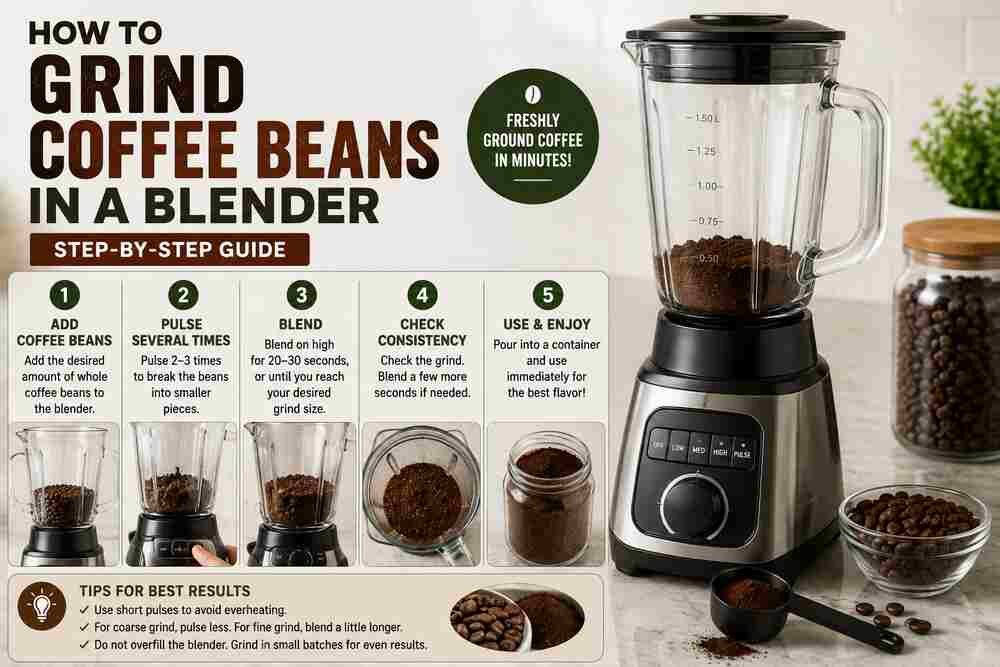
Pour about half a cup of whole beans into the blender jar. Smaller batches grind more evenly and heat up less than a full jar does. Close the lid firmly, since beans tend to fly around the moment the blades start spinning. Double-check that the lid is seated correctly before you turn the blender on.
Step 2: Choose the Right Setting
Use a dedicated grind setting if your blender has one. That setting is calibrated for dry, hard ingredients and gives you the most control. No grind setting? The pulse function is the next best option. It lets you grind in short, controlled bursts rather than one continuous blend. Save a continuous high setting for a last resort. It’s the hardest to control and the most likely to overheat the beans.
Step 3: Pulse in Short Bursts
Pulse the blender in bursts of three to five seconds, then stop and check the beans. Repeat this five or six times, which typically lands you in the twenty-to-thirty-second range overall. Working in short bursts matters more than any other single step in how to grind coffee beans in a blender. Long, continuous blending generates heat that cooks the beans slightly. That heat can release their natural oils too early, dulling the flavor before you ever brew a cup.
The video below shows this pulse-and-check technique in action, using a countertop blender to grind a batch of whole beans.

Step 4: Tilt and Check Consistency
Between pulses, tilt the blender jar gently from side to side. This moves the larger, uncut beans sitting near the top back down toward the blades. Otherwise they can get left behind while everything underneath turns to powder. Stop periodically to check the texture. You’re aiming for a grind that looks like coarse sand or kosher salt for most drip coffee. French press brewing calls for the opposite: a coarser grind. Adjust your pulse count based on whichever brew method you’re using.
Step 5: Repeat for More Coffee
If half a cup of grounds isn’t enough, empty the blender and start a fresh batch. Avoid adding more beans to what’s already ground. Mixing whole beans with already-ground coffee makes it nearly impossible to gauge when the new batch is done. You’ll also end up over-processing the grounds that were already fine. Repeat the process in small batches until you have what you need.
Grinding Coffee Beans in a Ninja Blender
Ninja blenders are common enough that they deserve their own note. If you’re using a Ninja with a single-serve cup attachment, add a small amount of beans. A smaller container makes it easier to get an even, fine grind without over-filling. Pulse rather than running it continuously. If you’re using the full-size pitcher instead, a cup of beans on the highest setting works. Just keep an eye on the clock. Running any blender, Ninja included, for more than about 30 seconds straight raises the risk of overheating the beans. That dulls their flavor. A Ninja blender can fill in for a grinder when you need it to. It still isn’t a permanent substitute for one, though, especially if you grind coffee every day.
Getting a More Consistent Grind Size
Grind consistency is the biggest limitation of using any blender. The blades cut unevenly compared to the crushing action of a burr grinder. You can narrow the gap with a few habits. Work in small batches, pulse instead of holding the blend button down, and tilt the jar so beans don’t settle unevenly. For reference, a medium grind, about the texture of kosher salt, works well for most drip coffee makers. If your coffee turns out bitter, your grind is probably too fine. If it tastes weak or sour, it’s likely too coarse. Once you’ve dialed in a texture that brews well, brewing is the next step. Our guide on making coffee in a Cuisinart coffee maker covers that part in detail.
Storing Beans and Grounds for the Best Results
A good grind can only do so much if the beans themselves are stale. Keep whole beans in an airtight container away from heat, light, and moisture. Buy in smaller quantities you’ll use within a few weeks. Whole beans hold onto their aroma and oils far longer than pre-ground coffee does. That’s part of why grinding fresh, even with a blender, usually beats buying coffee that’s already ground. Our guide on why fresh coffee beats instant covers this in more depth if you want the full picture.
No Blender Either? A Few Backup Options
If a blender isn’t available either, a few low-tech methods can still get you a cup of coffee. A mortar and pestle works well for small amounts and gives you the most control over texture, though it takes some elbow grease. A rolling pin also works. Seal beans in a sturdy freezer bag, then crush and roll over them on a cutting board until they break down. In a real pinch, a hammer works too. Tap it gently and repeatedly through a sealed bag rather than swinging hard, which just scatters beans everywhere. None of these methods are fast, and none produce a grind as even as a blender’s, let alone a real grinder’s. They’re worth knowing for the mornings when even the blender isn’t an option.
Common Mistakes to Avoid
- Grinding a full jar of beans at once. Large batches heat up faster and grind less evenly than smaller ones.
- Running the blender continuously instead of pulsing. Continuous blending is the main cause of overheated, flat-tasting coffee.
- Skipping the tilt. Beans that stay at the top of the jar never fully grind, leaving chunky pieces mixed into your grounds.
- Adding new beans to a partial batch of grounds. This makes it impossible to judge doneness and over-processes the beans that were already ground.
- Using stale beans. A blender can’t fix beans that have already lost their aroma and oils from sitting too long after roasting.
Frequently Asked Questions
What’s the quickest way to learn how to grind coffee beans in a blender?
Add half a cup of beans, pulse in short three-to-five-second bursts, tilt the jar between pulses, and check the texture often. That’s the whole process for how to grind coffee beans in a blender, from start to finish.
Can any blender grind coffee beans?
Most blenders can handle it, though results vary by power and blade design. High-powered blenders with a dedicated grind setting, like those from Blendtec or Vitamix, tend to produce a more even grind than basic models.
How long should I blend coffee beans for?
Aim for short pulses totaling around twenty to thirty seconds rather than one continuous blend. Check the texture every few pulses and stop as soon as you reach the consistency you want.
Why does blended coffee taste different from grinder-ground coffee?
Blade-style grinding, which includes blenders, generates more friction and heat than a burr grinder does. That heat can release aromatic oils earlier than they should. The result is sometimes a duller flavor compared to a fresh burr grind.
Can I grind coffee beans in a Ninja or NutriBullet?
Yes. A single-serve cup attachment works especially well for small batches, since it’s easier to get an even grind without overfilling the container. Use the pulse setting rather than running it continuously.
What grind size should I aim for?
A medium grind, about the texture of kosher salt, suits most drip coffee makers. Coarser grinds work better for French press. Finer grinds suit espresso, though a standard blender struggles to produce a fine, consistent espresso grind.
Will grinding coffee in a blender damage it?
Occasional grinding is generally fine for most blenders, since the blades are built to handle hard ingredients like ice and nuts. Frequent grinding may dull blades faster over time. A dedicated grinder is the better long-term option if you grind coffee daily.
Is a blender grind good enough for espresso?
Not really. Espresso needs a very fine, extremely consistent grind that blade-style appliances, blenders included, struggle to produce. Stick to drip, pour-over, or French press methods when grinding with a blender.
Final Thoughts
A blender won’t replace a dedicated coffee grinder, but it’s a genuinely useful backup when you’re out of options. Work in small batches, pulse instead of holding the button down, and tilt the jar as you go. You’ll end up with a grind that’s more than good enough for your next pot. If grinding by blender turns into a regular routine, our coffee grinder and brewer buyer’s guide can help you find a dedicated option. Our tips for the perfect cup of coffee cover everything else that goes into a great brew. Now that you know how to grind coffee beans in a blender, all that’s left is brewing the pot.


Hey, My name is MAMON. I am a SEO content creator and affiliate marketer with over 8 years of experience. I create honest product reviews, in-depth buying guides, and practical how-to articles to help readers make informed decisions. My mission is to provide trustworthy, research-backed content that delivers real value.