Step 1: Take Measurements
The first thing to do when building a custom range hood cover is to take measurements of your hood. Taking measurements is important because it helps you to build a range hood cover that fits the area that you want to install correctly. It will also help you know the materials that you will use for the project. Use a tape measure to take measurements of the range hood cover.
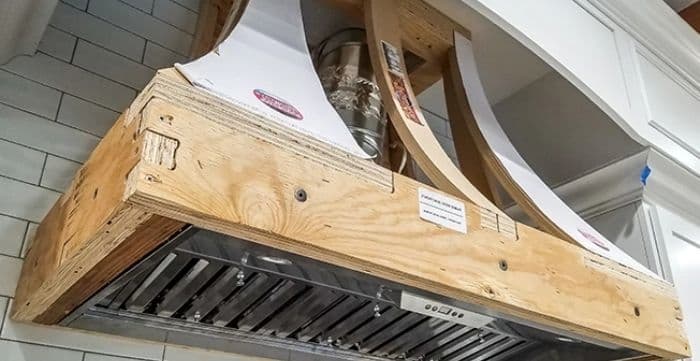
Step 2: Build a Frame
Once you have the correct measurement, the next step is to build a simple frame using wood and other raw materials that are necessary. Make sure the frame has both the side, back, and bottom support. The frame will take the place of the cabinet that the range hood fan would have been attached to. We highly recommend that you use strong wood to create the frame to make it strong and durable.
Step 3: Make Cutouts on Ductwork and Venting
Once you have built a solid frame for your range hood cover, the next process is to make cutouts for ductwork and venting. Where they will be directed depends on the design of your kitchen and where the vent is located in relation to where the cooking stove is. It is also important to note that how high the frame is mounted depends on the design and size of the range hood and your kitchen. When mounting the frame, use the wall to secure it safely.
Step 4: Attach the Range Hoods to the Frame
Once you have attached the frame securely to the wall, the next crucial process is to attach the range hood to the frame. If you took the initial measurements correctly, then this process will be seamless. Some range hoods come with instructions for mounting a range hood under the cabinets. Because the process is almost similar, you can follow those instructions when attaching the range hood to the frame.
Step 5: Connect Electrical Components
Connect all electrical components, including the lights and fan. Make sure you follow the instructions given on the hood range user manual when connecting electrical components. Please don’t hesitate to call an electrician if you need help.
Step 6: Connect the Ductwork
Once you have connected all electrical components as directed by the manufacturer, the next process is to connect the ductwork. We recommend that you follow the instructions given in the range hood user manual when connecting the ductwork. The technique that you use depends on the design of your kitchen and the duct between the range hood and the ductwork. Use tape on the joints to make them foolproof.
Step 7: Build a Cover
Once the ductwork is intact, the next process is to cover the frame. Use a soft board to cover the frame. Make sure that all corners of the frame are well covered and caulk all seams and joints. Caulking is important because it will make your new custom range hood cover look neat and attractive.
Step 8: Paint the Range Hood Cover
Once the installation process is complete, the final process is to paint the range hood cover. The painting will not only help the range hood look good but will also enhance its lifespan. We recommend that you use paint that blends well with the overall theme of your kitchen.
Importance of a custom range hood cover:
- It improves the appearance of your kitchen by making it look unique and attractive
- It helps to protect your range hood against scratches and other forms of damage that may reduce its lifespan
- They are super easy to clean
- They last for long if made with high quality and durable materials
Final Thoughts
Building a custom range hood cover is not difficult as many people think. It is a simple process that will take you a few hours to complete if you have all the tools and materials needed for the project. However, how you do the job matters a lot. If you want to have the best custom range hood, we recommend that you follow the simple steps given above,
